About Me!
I'm a busy stay-at-home mommy of a 2 year old monst-- er toddler. This is a blog about stuff I like to cook, including recipes and pictures. <3
recent entries
 Slow-Cooker Black Bean Soup Slow-Cooker Black Bean Soup
Giant V-day Candy Coated Sugar Cookies
French Croissants
Stovetop Popcorn - Way Easier Than Pie!
Trying out new things
Classic German Food
Not Exactly the Same Old Pumpkin Pie
Ginger Cookies
So easy its Cheesy... Yaki Onigiri
Little Pies
Messages
Archives

|
Sweet, Creamy and... Green! Avocado Ice Cream!
Friday, January 23, 2009 | Time: 6:16 AM
Some people might say - Avocado? Eww?! Here in the western part of the world, we generally only use Avocado in savory dishes, like guacamole or on sandwiches. But on the Asian side of the world, avocado is used like the fruit it actually is, in alot of sweet dishes! I highly recommend (my favorite flavor) avocado Bubble Tea (made with large tapioca pearls), if you happen to live near somewhere you can get the stuff, its totaly addictive.
This ice cream is a simliar to the bubble tea, without the 'bubbles' (tapioca) of course. Although you could certainly add cooked, cooled, tapioca pearls to this, it would be delish in ice cream. Or maybe bits of mochi! Yum.
Anyway, before I get carried away, here is the recipe. Origional one is here, from Alton Brown, but I changed it up just a little, using honey instead of sugar and coconut milk instaed of heavy cream.
----
 Avocado Ice Cream Avocado Ice Cream
adapted from Alton Brown's recipe
- 12 ounces avocado meat, approximately 3 small to medium
- 1 tablespoon freshly squeezed lemon juice
- 1 1/2 cups whole milk
- 1/2 cup honey
- 1 cup coconut milk
Peel and pit the avocados. Add the avocados, lemon juice, milk, and honey to a blender and puree. Transfer the mixture to a medium mixing bowl, add the coconut milk and whisk to combine. Place the mixture into the refrigerator and chill until it reaches 40 degrees F or below, approximately 4 to 6 hours. Process the mixture in an ice cream maker according to manufacturer's directions. However, this mixture sets up very fast, so count on it taking only 5 to 10 minutes to process. For soft ice cream, serve immediately. If desired, place in freezer for 3 to 4 hours for firmer texture. -----
Note: This ice cream tends to get hard as a rock after a while of being in the freezer. So try whipping the 'batter' before adding it to the machine (after its been chilled for a while) to add air to it. This helps!
Commenters on this recipe also suggested adding a bit of Almond Extract and pistachios to this. I've also heard of using Sour Cream in the recipe (about a cup) instead of milk.Labels: alton brown, avocado, bubble tea, coconut milk, honey, ice cream, recipe
OMG, Bibingka!
Thursday, January 22, 2009 | Time: 12:22 PM
New Asian food discovery - Bibingka! A Filipino rice cake made with rice flour, sort of like mochi in that way, but actually like a cake in texture.
 I discovered a (real, honest to god) Asian shop here in Odessa. Me is happy! I think its more Filipino, there were a lot of that kind of thing, including this box of Bibingka mix. Yay! New things to discover! Honestly I dont see alot of this boxed stuff with online searches about this product, mostly recipes from scratch - I suppose its cheaper just to make it with rice flour. But I didn't really know what it was so i just bought the mix. I discovered a (real, honest to god) Asian shop here in Odessa. Me is happy! I think its more Filipino, there were a lot of that kind of thing, including this box of Bibingka mix. Yay! New things to discover! Honestly I dont see alot of this boxed stuff with online searches about this product, mostly recipes from scratch - I suppose its cheaper just to make it with rice flour. But I didn't really know what it was so i just bought the mix.
Being the good old fashioned American I am, I didn't want it to be cheesy or eggy or salty like some of the recipes. Just something sweet! Since there are lots of ways of doing it, I opted out of putting in salted eggs or cottage cheese. I added cconut milk instead of water :) Num num nummy!
Bibingka
(from the mix)
3 eggs
1 package Bibingka mix (there are two in a box)
1 cup coconut milk (it actually calls for water but this is really good)
1/2 cup sugar
Whip eggs until frothy. Add the remaining ingredients, mix well.
Pour into greased pan and bake at preheated 450 F oven for about 10-15 min.
These came out like totaly delicate, fluffy, cupcakes. I made mine in a cupcake pan of course. Well the first batch I left in too long (while blogging XD) and the bottoms were burned. Be careful, these guys burn QUICK!! But the second batch, mmm heavenly little cakies!!
These would've been just plain ol' cakes if I hadn't added in the coconut milk. Its a mild flavor but gives it a nice coconut notes and a creamy aftertaste.
This boxed mix has wheat flour in them, but most of the 'from scratch' recipes I found did not. In which case, if I made them from scratch, these would be great for my nephew who is allergic to wheat! Hmm. Birthday ideas!
I wonder if the recipes without wheat flour would have a chewier texture?
I think next time I will try with raisins and cinnimon, and/or do the traditional thing of adding syrup on top (made with coconut milk and brown sugar).
I think you could use these as official 'glueten free' cupcakes, without all the weird ingredients that are hard to find. That is, if you can find rice flour.
For anyone interested in making these from scratch, here are a few good-looking recipes I ran across while googling this dessert:
Bibingka, a Filipino Treat from blog Lonley's Only Thought
Bibingka (Flat Cake) from Recipezaar
Quick Bibingka Recipe from blog Pizza by the Slice
Next, I think I'll try my hand at some Avocado Ice Cream...Labels: bibingka, cake, coconut milk, cupcake, filipino, glueten free
Sweetheart Lunch
Tuesday, January 20, 2009 | Time: 1:51 PM
I make lots of food for my sweetheart when he goes to work. He works 24 hour shifts, so thats breakfast, lunch, dinner and snacks. This ain't no 8oz bento.
Today I made:

'Bugulgi' Style Drumettes with Rice, Kimchi and Nori and Mochi
My hubby's Korean step father used to make Bugulgi with rice, meat, a yummy sauce and kimchi all piled onto sheets of sesame oil/salt fried nori. Little packets of delicious in your mouth! Today I made chicken drumettes with his signiture bugulgi sauce and included sheets of sushi nori and some rice. Yum!
Bugulgi style Sauce
1/4 c Soy Sauce
1 tbs Oyster Sauce
1/2 c water
1/4 c sugar (to taste)
1-2 tsp minced garlic
Dash or two of Fish Sauce
1 tbsp cornstarch
Combine all ingredients except corn starch in a pan on medium/high heat, let them simmer for a minute or two. In a small dish or cup, combine corn startch and just enough water until you can make a paste with your fingers (for example if you have 1tbsp cornstarch, add 1-2 tablespoons water). Grab your whisk! Working quickly, pour in corn starch mixture into sauce and whisk to combine (quickly or the starch will form chalky lumps). Let simmer again for a few minutes until thickened, to about the consistancy of syrup. Pour over meat and/or rice. Serve with kimchi.
((For drumettes, cook as you normally would [I cook them on a rack which is on top of a cookie sheet at about 375 for 20-30 min till golden on top and done through] But in the last 5 mins brush on the thickened sauce and change heat to Broil. Cook for 5 mins until the sauce melds with the chicken, making a nice (almost crispy) crust.))
I packed his lunch with two little squeeze bottles (from IchibanKan) with extra sauce.
 Riceballs with cooked jasmine rice. Jasmine rice tends to be more... glutinous? Anyway it works for making sticky rice and I really like the flavor and scent. These were just cooked in a rice cooker (with just a tad more water than usual), cooled, then formed into 'riceballs' by twisting in some plastic wrap, with a little salt added in. Riceballs with cooked jasmine rice. Jasmine rice tends to be more... glutinous? Anyway it works for making sticky rice and I really like the flavor and scent. These were just cooked in a rice cooker (with just a tad more water than usual), cooled, then formed into 'riceballs' by twisting in some plastic wrap, with a little salt added in.
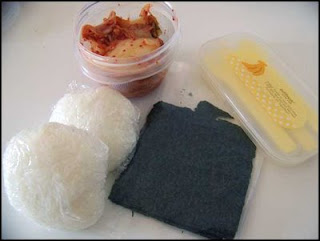 In the picture: sushi nori in a ziplock bag, riceballs, container of kimchi and a cute set of plastic utinsils from IchibanKan. In the picture: sushi nori in a ziplock bag, riceballs, container of kimchi and a cute set of plastic utinsils from IchibanKan.
 Mochi!! Mochi!!
Mochi is made with sweet, glutinous rice. Its a chewy textured dessert that you can customize in lots of different ways just by adding things to the mix, or stuffing them after they've cooked. I've even had deep fried mochi, its really really good :d!! Also, its really easy to make, and quick. Especially with this special secret method - microwaving! Ok maybe not so secret or special, but its the way I perfer to do it :)
1 c Mochiko (or glutinous rice flour)
1/4 cup sugar
1 c water
cornstarch or rice flour for coating
Combine ingredients in a greased, microwave safe dish (I use a square Glad container) and cover with plastic wrap. Microwave on high for about 4 minutes. Turn out onto a floured board and, when cool, cut into squares. Roll in corn starch or rice flour to coat.
The Stuffing Method:
Take out and cool slightly, just until you can handle it without being burned. Tear off walnut sized chunks, form into a ball, poke your finger in the middle and fill with desired filling. Pinch edges to seal and roll in corn starch / rice flour to coat.
Note: I stuffed some of mine with Strawberry Jam. ---> --->

'Fake' Enchiladas with Corn Muffins and Sliced Pears
I call these 'fake' enchiladas because its kind of like making enchiladas but its really more of a burrito. This is great for leftover 'Mexican' food-stuff.
Makes 4 'fake' enchiladas
1/4lb 'taco' meat (cooked meat such as ground beef or turkey, with taco seasoning)
4 tbs refried beans
4 handfulls of shredded cheese
4 corn tortillas
2 more handfulls Shredded Cheese, 1/2 c Salsa
Heat tortillas in microwave for about 20 seconds (this is so they don't break when you roll them). Working with one tortilla at a time, spread with 1tbsp refried beans, 1/4 of the meat and a handfull of shredded cheese. Roll gently, using the beans to stick the seam closed. Place 'enchiladas' in a small pan (i used a round cake pan), pour Salsa over the top to cover and sprinkle the rest of the cheese on top. Bake in preheated 375 degree oven until cheese melts and starts to brown.
 The corn muffins are from this cornbread recipe. I'd previously put half the batter in the freezer for just such an occasion. And the sliced pears were tinned, in pear juice (not syrup). I put most of my (liquid-y) sides in these handy rubbermaid containers. I just love these little things! The lids screw on, so they dont spill. The corn muffins are from this cornbread recipe. I'd previously put half the batter in the freezer for just such an occasion. And the sliced pears were tinned, in pear juice (not syrup). I put most of my (liquid-y) sides in these handy rubbermaid containers. I just love these little things! The lids screw on, so they dont spill.
 For breakfast, I also packed a nice chunk of Egg Casserole (based on South Beach Diet's Sausage and Cheese Breakfast Cups, but in a casserole pan.I omitted the sausage, but used ham and jalapenos!) They don't usually have microwaves where my hubby works but (oddly) they do have gas stoves. I wrapped the casserolle in some aluminum foil so he can reheat it in the morning. For breakfast, I also packed a nice chunk of Egg Casserole (based on South Beach Diet's Sausage and Cheese Breakfast Cups, but in a casserole pan.I omitted the sausage, but used ham and jalapenos!) They don't usually have microwaves where my hubby works but (oddly) they do have gas stoves. I wrapped the casserolle in some aluminum foil so he can reheat it in the morning.Labels: bugulgi, corn bread, corn muffin, enchiladas, kim chee, kim chi, korean, mochi, nori, recipe, rice
Carne Asado with The Perfect Cornbread
Thursday, January 15, 2009 | Time: 9:11 AM
Hubby recently requested Asado. Its a Mexican dish with (usually) beef in a tomato sauce with lots of cumin. There are several ways of doing it, actually, but Hubby insists this is the authentic way. Anyway its really good :)
 Carne Asado Carne Asado
1 lb beef stew meat, cubed to bite size peices
2 garlic cloves, chopped (or a tablespoon of minced garlic)
1/2 an onion, chopped
1 tablespoon cumin
1-2 teaspoons black pepper
2 heaping tablespoons tomato paste (or about a 15oz can of tomato sauce, omit half the water later)
1/2 can of Rotel tomatoes (I used HOT with habanero peppers. Use the whole can if you like.)
1 beef bouillon cube
2 tablespoons flour
Water
Combine everything except water and flour in a crock pot (slow cooker). Add water to cover, say about 4 cups? I eyeball it. Turn on high and cook for 3-4 hours, or low for 4-6 hours. At the end of cooking, whisk in about a tablespoon of flour to thicken the sauce, let it cook until thickened (another 10 minutes or so on high). Salt to taste, if needed.
Of course you can cook this in a pot too, same directions, (though you can also pan sear the meat and onions first) but cook it for 1-1.5 hours on medium heat.
Serve over rice.
- OR with -
 The Perfect Cornbread The Perfect Cornbread
I'm quite fond of cornbread, but its usually a bit dry and heavy. This recipe, however, is neither. Its probably the best ever cornbread recipe, so give it a try!
Makes two 8" round breads or one sheet-pan bread.
1 1/2 cups cornmeal
2 1/2 cups milk
2 cups all-purpose flour
1 tablespoon baking powder
1 teaspoon salt
2/3 cup white sugar
2 eggs
1/2 cup vegetable oil
optional additions - frozen corn kernels, chopped black olives, a handful of cheese
1. Preheat oven to 400 degrees. Grease a round (pie or cake) pan - I use olive oil cooking spray.
2. In a small bowl, combine cornmeal and milk. Add in optional additions - corn, olives, etc. Let stand for 5 minutes.
3. In a large bowl, whisk together flour, baking powder, salt and sugar. Mix in the cornmeal mixture, eggs and oil until smooth. Pour batter into prepared pan. Sprinkle on cheese (optional) - I used mozzarella; cheddar or Mexican mix is great too.
4. Bake in preheated oven for 30 to 35 minutes, or until a knife inserted into the center of the cornbread comes out clean and cheese is nicely browned on top.
Note: I used half the batter in one 8" round cake pan. The rest I put in a freezer bag, in the freezer, so I can make it again without much fuss.Labels: asado, beef, carne asado, corn bread, mexican, recipe, stew
Scotch Eggs... Another Way
| Time: 8:00 AM
Scotch eggs are really cool. Its like a whole breakfast in one little delicious bundle. Or two, if you've got a big appetite! They're basically hard boiled eggs, wrapped in sausage, then breadcrumbs, and fried. Yum, right? Heart attack city, right?
Well, I discovered you can bake them, too. Apparently its just as good. Quite a bit healthier. Haven't tried it yet. Honestly, its because I don't have any bread crumbs.
But, today, I am inspired! I've been browsing through this fantastic bento site by a real Japanese lady who really knows what she's doing (Jealous! Wish she was MY mom, right?) and I noticed one of the pictures (the site is in Japanese, so I just window shop) had Scotch eggs but it looked as if she wrapped them in prosciutto!! Brilliant!
I never buy prosciutto, but I decided to make my own version. I've got loads of turkey bacon (Sams has a big box of 3 whole packages for under $5! I've got two packages just chillin' in my freezer.) So this is a great way to use it up.
No need for a recipe, really.

Just take a hard boiled egg and two pieces of turkey bacon... Wrap the egg long ways with one piece of bacon, hold it secure with your finger while you wrap it horizontal-ways with another piece of bacon. Secure with a toothpick. Or in my case, I've got these handy metal skewers - reusable! (I like to use them to make stuffed chicken or pork chops, they hold up better and don't mind being cooked.)
Then bake at 400 degrees Fahrenheit for 20-30 minutes until they're crispy on the outside, or however you like your bacon in the mornings.
These are wonderful in lunches, great cold or hot.
 Labels: bacon, prosciutto, recipe, scotch eggs, turkey bacon
Rice Pancakes
Monday, January 12, 2009 | Time: 5:50 AM
My hubby recently decided he wants to eat less wheat. Doctors say it may be the cause of skin problems for him, he has very dry skin that cracks and gets icky. Its not exactly Eczema, but more of an allergy?
Anyways, I've been looking for good recipes for rice and found a decent one today. Its actually a pretty old recipe, in Asian families, for leftover rice in the mornings.
These are a bit like Latkes - potato pancakes - but with rice instead!
Basically you take cooked, leftover rice (it could even be leftover Chinese takey-outy fried rice!) and add enough egg to make it a batter (like pancake batter). Then fry them, like you would pancakes, turn them after a few minutes on one side.
I think this would be great as a sweet or savory dish - you could add butter and maple syrup for a sweet treat, or go the Asian way and add veggies and meat or whatever you have leftover from dinner. Serve with hot pepper sauce.
These might be great as bento lunch sides.

Rice Pancakes Recipe
Adapted from Nihonhacks.com
3 cups leftover cooked brown rice (or leftover Chinese fried rice)
2 eggs
butter or oil for frying
Salt to taste 1. Combine leftover rice and eggs together until well mixed. 2. Heat a skillet over medium-high heat. Add butter and allow to melt, tilting pan to coat. 3. Drop batter into skillet by large spoonsful and allow to brown, then flip and brown on other side. 4. Add salt to taste and serve.
Strawberry Meringue Cookies
Thursday, January 8, 2009 | Time: 1:47 PM
Y'know, I've always had trouble making meringue cookies. They've been too eggy or too flat or just plain weird. But today I tried once again and actually managed to make a decent cookie! I think having a little patience and using cream of tartar is a very helpful thing XD
This makes about 2 dozen cookies.
Strawberry Meringue Cookies
adapted from Chocolate Meringue Cookies recipe at Allrecipes.com
- 3 egg whites
- 1/8 teaspoon cream of tartar
- 2/3 cup white sugar
- 1/4 cup smashed fresh (or drained, frozen) strawberries
- Preheat oven to 300 degrees F (150 degrees C).
- Make sure you drain the strawberries well. Try pressing them on a fine sieve with a fork. Let the juice drip into a bowl to use in something else.
- Combine egg whites and cream of tartar. Beat until the whites form soft peaks. Slowly add sugar; beat until stiff peaks form, and mixture becomes glossy. Fold in strawberries.
- Drop mixture by spoon fulls greased cookie sheet. Bake for 25 to 30 minutes.
If you want to be fancy you can load these into a piping bag with a star tip and do it like you see them at shops! They're just as tasty eaither way.
I also made some of these with a little bit of chocolate-mint coffee and cocoa powder. Whats a little bit? Say 1 tsp.
YUM <3
Phyllo Dough Rocks!
| Time: 11:56 AM
I'm very excited about this 'new' recipe I discovered. After days of trying to figure out what to do with the last few chicken breasts I had in the 'fridge, as well as a few odds and ends in the freezer (such as a box of phyllo dough) I happened across this delightful recipe. I made my own changes, of course. I didn't have any tarragon as the recipe suggests, but I quickly realized this recipe could be super flexible. It uses mayo as a base, mixed with a little lemon juice, garlic and a savory herb, all of which is wrapped up in a pretty phyllo packet and baked. It takes all of about 5 minutes to prepare, if you have all the ingredients on hand.
Phyllo Chicken Packets
adapted from Allrecipes.com

- 1/4 cup mayonnaise
- 1 tablespoons lemon juice
- 2 teaspoons minced garlic
- 1/2 teaspoon dried rosemary
- 12 sheets phyllo dough (18 inches x 14 inches)
- 2 skinless, boneless chicken breasts, halved
- salt and pepper to taste
- Olive Oil or Butter Cooking Spray
- Parmesan Cheese
- In a small bowl, combine the mayonnaise, lemon juice, garlic and rosemary; set aside.
- Place sheets of phyllo dough on a work surface with a short edge facing you. Portion 4 stacks side by side, of about 4 sheets each. (Or just eyeball it, divide up one package of dough into 4 sections). Spray with cooking spray to coat. (Note: Be sure and keep the remaining phyllo dough covered with plastic wrap to avoid drying out).
- Lightly sprinkle chicken breasts with salt and pepper. Center one chicken breast on the lower third of one stack of phyllo. Spread about 3 tablespoons of mayonnaise mixture over chicken breast. Fold bottom edge over chicken, then fold in sides. Roll up jelly-roll style; set on baking tray or cookie sheet. (I like to use a cookie sheet with a rack on top, to keep things from getting soggy) Make three more chicken packets.
- Spray tops with cooking spray again to coat. Sprinkle with Parmesan cheese. Bake uncovered, at 350 degrees F for 25-30 minutes or until chicken is cooked through. Serve warm.
Thats it, it only takes a few minutes to put together.
You could do alot of things with this style of recipe. Like substitue different herbs, or add some cheese. Or use cream cheese and pesto instead of the mayo mixture. I suppose you could even make a sort of baked 'eggroll' with a few jullienned veggies like cabbage, carrot, uhh.. what else do you put in eggrolls? Anyway, eggroll stuff.
This was a fun recipe. I encourage anyone to try it! Its elegant too. And of course, easy, which is what I like most.
<3
|
Sweet, Creamy and... Green! Avocado Ice Cream!
Friday, January 23, 2009 | Time: 6:16 AM
Some people might say - Avocado? Eww?! Here in the western part of the world, we generally only use Avocado in savory dishes, like guacamole or on sandwiches. But on the Asian side of the world, avocado is used like the fruit it actually is, in alot of sweet dishes! I highly recommend (my favorite flavor) avocado Bubble Tea (made with large tapioca pearls), if you happen to live near somewhere you can get the stuff, its totaly addictive.
This ice cream is a simliar to the bubble tea, without the 'bubbles' (tapioca) of course. Although you could certainly add cooked, cooled, tapioca pearls to this, it would be delish in ice cream. Or maybe bits of mochi! Yum.
Anyway, before I get carried away, here is the recipe. Origional one is here, from Alton Brown, but I changed it up just a little, using honey instead of sugar and coconut milk instaed of heavy cream.
----
Avocado Ice Cream
adapted from Alton Brown's recipe
- 12 ounces avocado meat, approximately 3 small to medium
- 1 tablespoon freshly squeezed lemon juice
- 1 1/2 cups whole milk
- 1/2 cup honey
- 1 cup coconut milk
Peel and pit the avocados. Add the avocados, lemon juice, milk, and honey to a blender and puree. Transfer the mixture to a medium mixing bowl, add the coconut milk and whisk to combine. Place the mixture into the refrigerator and chill until it reaches 40 degrees F or below, approximately 4 to 6 hours. Process the mixture in an ice cream maker according to manufacturer's directions. However, this mixture sets up very fast, so count on it taking only 5 to 10 minutes to process. For soft ice cream, serve immediately. If desired, place in freezer for 3 to 4 hours for firmer texture. -----
Note: This ice cream tends to get hard as a rock after a while of being in the freezer. So try whipping the 'batter' before adding it to the machine (after its been chilled for a while) to add air to it. This helps!
Commenters on this recipe also suggested adding a bit of Almond Extract and pistachios to this. I've also heard of using Sour Cream in the recipe (about a cup) instead of milk.Labels: alton brown, avocado, bubble tea, coconut milk, honey, ice cream, recipe
OMG, Bibingka!
Thursday, January 22, 2009 | Time: 12:22 PM
New Asian food discovery - Bibingka! A Filipino rice cake made with rice flour, sort of like mochi in that way, but actually like a cake in texture.
I discovered a (real, honest to god) Asian shop here in Odessa. Me is happy! I think its more Filipino, there were a lot of that kind of thing, including this box of Bibingka mix. Yay! New things to discover! Honestly I dont see alot of this boxed stuff with online searches about this product, mostly recipes from scratch - I suppose its cheaper just to make it with rice flour. But I didn't really know what it was so i just bought the mix.
Being the good old fashioned American I am, I didn't want it to be cheesy or eggy or salty like some of the recipes. Just something sweet! Since there are lots of ways of doing it, I opted out of putting in salted eggs or cottage cheese. I added cconut milk instead of water :) Num num nummy!
Bibingka
(from the mix)
3 eggs
1 package Bibingka mix (there are two in a box)
1 cup coconut milk (it actually calls for water but this is really good)
1/2 cup sugar
Whip eggs until frothy. Add the remaining ingredients, mix well.
Pour into greased pan and bake at preheated 450 F oven for about 10-15 min.
These came out like totaly delicate, fluffy, cupcakes. I made mine in a cupcake pan of course. Well the first batch I left in too long (while blogging XD) and the bottoms were burned. Be careful, these guys burn QUICK!! But the second batch, mmm heavenly little cakies!!
These would've been just plain ol' cakes if I hadn't added in the coconut milk. Its a mild flavor but gives it a nice coconut notes and a creamy aftertaste.
This boxed mix has wheat flour in them, but most of the 'from scratch' recipes I found did not. In which case, if I made them from scratch, these would be great for my nephew who is allergic to wheat! Hmm. Birthday ideas!
I wonder if the recipes without wheat flour would have a chewier texture?
I think next time I will try with raisins and cinnimon, and/or do the traditional thing of adding syrup on top (made with coconut milk and brown sugar).
I think you could use these as official 'glueten free' cupcakes, without all the weird ingredients that are hard to find. That is, if you can find rice flour.
For anyone interested in making these from scratch, here are a few good-looking recipes I ran across while googling this dessert:
Bibingka, a Filipino Treat from blog Lonley's Only Thought
Bibingka (Flat Cake) from Recipezaar
Quick Bibingka Recipe from blog Pizza by the Slice
Next, I think I'll try my hand at some Avocado Ice Cream...Labels: bibingka, cake, coconut milk, cupcake, filipino, glueten free
Sweetheart Lunch
Tuesday, January 20, 2009 | Time: 1:51 PM
I make lots of food for my sweetheart when he goes to work. He works 24 hour shifts, so thats breakfast, lunch, dinner and snacks. This ain't no 8oz bento.
Today I made:
'Bugulgi' Style Drumettes with Rice, Kimchi and Nori and Mochi
My hubby's Korean step father used to make Bugulgi with rice, meat, a yummy sauce and kimchi all piled onto sheets of sesame oil/salt fried nori. Little packets of delicious in your mouth! Today I made chicken drumettes with his signiture bugulgi sauce and included sheets of sushi nori and some rice. Yum!
Bugulgi style Sauce
1/4 c Soy Sauce
1 tbs Oyster Sauce
1/2 c water
1/4 c sugar (to taste)
1-2 tsp minced garlic
Dash or two of Fish Sauce
1 tbsp cornstarch
Combine all ingredients except corn starch in a pan on medium/high heat, let them simmer for a minute or two. In a small dish or cup, combine corn startch and just enough water until you can make a paste with your fingers (for example if you have 1tbsp cornstarch, add 1-2 tablespoons water). Grab your whisk! Working quickly, pour in corn starch mixture into sauce and whisk to combine (quickly or the starch will form chalky lumps). Let simmer again for a few minutes until thickened, to about the consistancy of syrup. Pour over meat and/or rice. Serve with kimchi.
((For drumettes, cook as you normally would [I cook them on a rack which is on top of a cookie sheet at about 375 for 20-30 min till golden on top and done through] But in the last 5 mins brush on the thickened sauce and change heat to Broil. Cook for 5 mins until the sauce melds with the chicken, making a nice (almost crispy) crust.))
I packed his lunch with two little squeeze bottles (from IchibanKan) with extra sauce.
Riceballs with cooked jasmine rice. Jasmine rice tends to be more... glutinous? Anyway it works for making sticky rice and I really like the flavor and scent. These were just cooked in a rice cooker (with just a tad more water than usual), cooled, then formed into 'riceballs' by twisting in some plastic wrap, with a little salt added in.
In the picture: sushi nori in a ziplock bag, riceballs, container of kimchi and a cute set of plastic utinsils from IchibanKan. Kimchi and sushi Nori were storebought. Hubby loves his kimchi. I'd love to learn to make it, it's pretty easy I think. But I have to find somewhere that I can buy radish (his fav type), its hard to find asian ingredients in West Texas. Anyways, I make Kimchi style pickles though - combine cucumber slices, vinegar, asian hot pepper sauce, soy sauce and sesame oil and refridgerate for at least 30 mins. Keeps forever, but doesn't last long around here. These are great in salads, too.
Mochi!!
Mochi is made with sweet, glutinous rice. Its a chewy textured dessert that you can customize in lots of different ways just by adding things to the mix, or stuffing them after they've cooked. I've even had deep fried mochi, its really really good :d!! Also, its really easy to make, and quick. Especially with this special secret method - microwaving! Ok maybe not so secret or special, but its the way I perfer to do it :)
1 c Mochiko (or glutinous rice flour)
1/4 cup sugar
1 c water
cornstarch or rice flour for coating
Combine ingredients in a greased, microwave safe dish (I use a square Glad container) and cover with plastic wrap. Microwave on high for about 4 minutes. Turn out onto a floured board and, when cool, cut into squares. Roll in corn starch or rice flour to coat.
The Stuffing Method:
Take out and cool slightly, just until you can handle it without being burned. Tear off walnut sized chunks, form into a ball, poke your finger in the middle and fill with desired filling. Pinch edges to seal and roll in corn starch / rice flour to coat.
Note: I stuffed some of mine with Strawberry Jam. --->
'Fake' Enchiladas with Corn Muffins and Sliced Pears
I call these 'fake' enchiladas because its kind of like making enchiladas but its really more of a burrito. This is great for leftover 'Mexican' food-stuff.
Makes 4 'fake' enchiladas
1/4lb 'taco' meat (cooked meat such as ground beef or turkey, with taco seasoning)
4 tbs refried beans
4 handfulls of shredded cheese
4 corn tortillas
2 more handfulls Shredded Cheese, 1/2 c Salsa
Heat tortillas in microwave for about 20 seconds (this is so they don't break when you roll them). Working with one tortilla at a time, spread with 1tbsp refried beans, 1/4 of the meat and a handfull of shredded cheese. Roll gently, using the beans to stick the seam closed. Place 'enchiladas' in a small pan (i used a round cake pan), pour Salsa over the top to cover and sprinkle the rest of the cheese on top. Bake in preheated 375 degree oven until cheese melts and starts to brown.
The corn muffins are from this cornbread recipe. I'd previously put half the batter in the freezer for just such an occasion. And the sliced pears were tinned, in pear juice (not syrup). I put most of my (liquid-y) sides in these handy rubbermaid containers. I just love these little things! The lids screw on, so they dont spill.
For breakfast, I also packed a nice chunk of Egg Casserole (based on South Beach Diet's Sausage and Cheese Breakfast Cups, but in a casserole pan.I omitted the sausage, but used ham and jalapenos!) They don't usually have microwaves where my hubby works but (oddly) they do have gas stoves. I wrapped the casserolle in some aluminum foil so he can reheat it in the morning.Labels: bugulgi, corn bread, corn muffin, enchiladas, kim chee, kim chi, korean, mochi, nori, recipe, rice
Carne Asado with The Perfect Cornbread
Thursday, January 15, 2009 | Time: 9:11 AM
Hubby recently requested Asado. Its a Mexican dish with (usually) beef in a tomato sauce with lots of cumin. There are several ways of doing it, actually, but Hubby insists this is the authentic way. Anyway its really good :)
Carne Asado
1 lb beef stew meat, cubed to bite size peices
2 garlic cloves, chopped (or a tablespoon of minced garlic)
1/2 an onion, chopped
1 tablespoon cumin
1-2 teaspoons black pepper
2 heaping tablespoons tomato paste (or about a 15oz can of tomato sauce, omit half the water later)
1/2 can of Rotel tomatoes (I used HOT with habanero peppers. Use the whole can if you like.)
1 beef bouillon cube
2 tablespoons flour
Water
Combine everything except water and flour in a crock pot (slow cooker). Add water to cover, say about 4 cups? I eyeball it. Turn on high and cook for 3-4 hours, or low for 4-6 hours. At the end of cooking, whisk in about a tablespoon of flour to thicken the sauce, let it cook until thickened (another 10 minutes or so on high). Salt to taste, if needed.
Of course you can cook this in a pot too, same directions, (though you can also pan sear the meat and onions first) but cook it for 1-1.5 hours on medium heat.
Serve over rice.
- OR with -
The Perfect Cornbread
I'm quite fond of cornbread, but its usually a bit dry and heavy. This recipe, however, is neither. Its probably the best ever cornbread recipe, so give it a try!
Makes two 8" round breads or one sheet-pan bread.
1 1/2 cups cornmeal
2 1/2 cups milk
2 cups all-purpose flour
1 tablespoon baking powder
1 teaspoon salt
2/3 cup white sugar
2 eggs
1/2 cup vegetable oil
optional additions - frozen corn kernels, chopped black olives, a handful of cheese
1. Preheat oven to 400 degrees. Grease a round (pie or cake) pan - I use olive oil cooking spray.
2. In a small bowl, combine cornmeal and milk. Add in optional additions - corn, olives, etc. Let stand for 5 minutes.
3. In a large bowl, whisk together flour, baking powder, salt and sugar. Mix in the cornmeal mixture, eggs and oil until smooth. Pour batter into prepared pan. Sprinkle on cheese (optional) - I used mozzarella; cheddar or Mexican mix is great too.
4. Bake in preheated oven for 30 to 35 minutes, or until a knife inserted into the center of the cornbread comes out clean and cheese is nicely browned on top.
Note: I used half the batter in one 8" round cake pan. The rest I put in a freezer bag, in the freezer, so I can make it again without much fuss.Labels: asado, beef, carne asado, corn bread, mexican, recipe, stew
Scotch Eggs... Another Way
| Time: 8:00 AM
Scotch eggs are really cool. Its like a whole breakfast in one little delicious bundle. Or two, if you've got a big appetite! They're basically hard boiled eggs, wrapped in sausage, then breadcrumbs, and fried. Yum, right? Heart attack city, right?
Well, I discovered you can bake them, too. Apparently its just as good. Quite a bit healthier. Haven't tried it yet. Honestly, its because I don't have any bread crumbs.
But, today, I am inspired! I've been browsing through this fantastic bento site by a real Japanese lady who really knows what she's doing (Jealous! Wish she was MY mom, right?) and I noticed one of the pictures (the site is in Japanese, so I just window shop) had Scotch eggs but it looked as if she wrapped them in prosciutto!! Brilliant!
I never buy prosciutto, but I decided to make my own version. I've got loads of turkey bacon (Sams has a big box of 3 whole packages for under $5! I've got two packages just chillin' in my freezer.) So this is a great way to use it up.
No need for a recipe, really.
Just take a hard boiled egg and two pieces of turkey bacon... Wrap the egg long ways with one piece of bacon, hold it secure with your finger while you wrap it horizontal-ways with another piece of bacon. Secure with a toothpick. Or in my case, I've got these handy metal skewers - reusable! (I like to use them to make stuffed chicken or pork chops, they hold up better and don't mind being cooked.)
Then bake at 400 degrees Fahrenheit for 20-30 minutes until they're crispy on the outside, or however you like your bacon in the mornings.
These are wonderful in lunches, great cold or hot.
Labels: bacon, prosciutto, recipe, scotch eggs, turkey bacon
Rice Pancakes
Monday, January 12, 2009 | Time: 5:50 AM
My hubby recently decided he wants to eat less wheat. Doctors say it may be the cause of skin problems for him, he has very dry skin that cracks and gets icky. Its not exactly Eczema, but more of an allergy?
Anyways, I've been looking for good recipes for rice and found a decent one today. Its actually a pretty old recipe, in Asian families, for leftover rice in the mornings.
These are a bit like Latkes - potato pancakes - but with rice instead!
Basically you take cooked, leftover rice (it could even be leftover Chinese takey-outy fried rice!) and add enough egg to make it a batter (like pancake batter). Then fry them, like you would pancakes, turn them after a few minutes on one side.
I think this would be great as a sweet or savory dish - you could add butter and maple syrup for a sweet treat, or go the Asian way and add veggies and meat or whatever you have leftover from dinner. Serve with hot pepper sauce.
These might be great as bento lunch sides.
Rice Pancakes Recipe
Adapted from Nihonhacks.com
3 cups leftover cooked brown rice (or leftover Chinese fried rice)
2 eggs
butter or oil for frying
Salt to taste 1. Combine leftover rice and eggs together until well mixed. 2. Heat a skillet over medium-high heat. Add butter and allow to melt, tilting pan to coat. 3. Drop batter into skillet by large spoonsful and allow to brown, then flip and brown on other side. 4. Add salt to taste and serve.
Strawberry Meringue Cookies
Thursday, January 8, 2009 | Time: 1:47 PM
Y'know, I've always had trouble making meringue cookies. They've been too eggy or too flat or just plain weird. But today I tried once again and actually managed to make a decent cookie! I think having a little patience and using cream of tartar is a very helpful thing XD
This makes about 2 dozen cookies.
Strawberry Meringue Cookies
adapted from Chocolate Meringue Cookies recipe at Allrecipes.com
- 3 egg whites
- 1/8 teaspoon cream of tartar
- 2/3 cup white sugar
- 1/4 cup smashed fresh (or drained, frozen) strawberries
- Preheat oven to 300 degrees F (150 degrees C).
- Make sure you drain the strawberries well. Try pressing them on a fine sieve with a fork. Let the juice drip into a bowl to use in something else.
- Combine egg whites and cream of tartar. Beat until the whites form soft peaks. Slowly add sugar; beat until stiff peaks form, and mixture becomes glossy. Fold in strawberries.
- Drop mixture by spoon fulls greased cookie sheet. Bake for 25 to 30 minutes.
If you want to be fancy you can load these into a piping bag with a star tip and do it like you see them at shops! They're just as tasty eaither way.
I also made some of these with a little bit of chocolate-mint coffee and cocoa powder. Whats a little bit? Say 1 tsp.
YUM <3
Phyllo Dough Rocks!
| Time: 11:56 AM
I'm very excited about this 'new' recipe I discovered. After days of trying to figure out what to do with the last few chicken breasts I had in the 'fridge, as well as a few odds and ends in the freezer (such as a box of phyllo dough) I happened across this delightful recipe. I made my own changes, of course. I didn't have any tarragon as the recipe suggests, but I quickly realized this recipe could be super flexible. It uses mayo as a base, mixed with a little lemon juice, garlic and a savory herb, all of which is wrapped up in a pretty phyllo packet and baked. It takes all of about 5 minutes to prepare, if you have all the ingredients on hand.
Phyllo Chicken Packets
adapted from Allrecipes.com
- 1/4 cup mayonnaise
- 1 tablespoons lemon juice
- 2 teaspoons minced garlic
- 1/2 teaspoon dried rosemary
- 12 sheets phyllo dough (18 inches x 14 inches)
- 2 skinless, boneless chicken breasts, halved
- salt and pepper to taste
- Olive Oil or Butter Cooking Spray
- Parmesan Cheese
- In a small bowl, combine the mayonnaise, lemon juice, garlic and rosemary; set aside.
- Place sheets of phyllo dough on a work surface with a short edge facing you. Portion 4 stacks side by side, of about 4 sheets each. (Or just eyeball it, divide up one package of dough into 4 sections). Spray with cooking spray to coat. (Note: Be sure and keep the remaining phyllo dough covered with plastic wrap to avoid drying out).
- Lightly sprinkle chicken breasts with salt and pepper. Center one chicken breast on the lower third of one stack of phyllo. Spread about 3 tablespoons of mayonnaise mixture over chicken breast. Fold bottom edge over chicken, then fold in sides. Roll up jelly-roll style; set on baking tray or cookie sheet. (I like to use a cookie sheet with a rack on top, to keep things from getting soggy) Make three more chicken packets.
- Spray tops with cooking spray again to coat. Sprinkle with Parmesan cheese. Bake uncovered, at 350 degrees F for 25-30 minutes or until chicken is cooked through. Serve warm.
Thats it, it only takes a few minutes to put together.
You could do alot of things with this style of recipe. Like substitue different herbs, or add some cheese. Or use cream cheese and pesto instead of the mayo mixture. I suppose you could even make a sort of baked 'eggroll' with a few jullienned veggies like cabbage, carrot, uhh.. what else do you put in eggrolls? Anyway, eggroll stuff.
This was a fun recipe. I encourage anyone to try it! Its elegant too. And of course, easy, which is what I like most.
<3
|
about me

me me me me me meeeee....
|
blog roll
- your links here


|
about my site
This site was designed by BibiPiggy and edited by ME :o) Links to give credit:
stephanie | designer
wordpress | inspiration
evelyn's place | pixels
lovelycore | pixels
sweet-note | image
annabel | others
|

 Avocado Ice Cream
 I discovered a (real, honest to god) Asian shop here in Odessa. Me is happy! I think its more Filipino, there were a lot of that kind of thing, including this box of Bibingka mix. Yay! New things to discover! Honestly I dont see alot of this boxed stuff with online searches about this product, mostly recipes from scratch - I suppose its cheaper just to make it with rice flour. But I didn't really know what it was so i just bought the mix.
 Riceballs with cooked jasmine rice. Jasmine rice tends to be more... glutinous? Anyway it works for making sticky rice and I really like the flavor and scent. These were just cooked in a rice cooker (with just a tad more water than usual), cooled, then formed into 'riceballs' by twisting in some plastic wrap, with a little salt added in.
 In the picture: sushi nori in a ziplock bag, riceballs, container of kimchi and a cute set of plastic utinsils from IchibanKan.
  Mochi!!
 --->
--->
 The corn muffins are from this cornbread recipe. I'd previously put half the batter in the freezer for just such an occasion. And the sliced pears were tinned, in pear juice (not syrup). I put most of my (liquid-y) sides in these handy rubbermaid containers. I just love these little things! The lids screw on, so they dont spill.
 For breakfast, I also packed a nice chunk of Egg Casserole (based on South Beach Diet's Sausage and Cheese Breakfast Cups, but in a casserole pan.I omitted the sausage, but used ham and jalapenos!) They don't usually have microwaves where my hubby works but (oddly) they do have gas stoves. I wrapped the casserolle in some aluminum foil so he can reheat it in the morning.
 Carne Asado
 The Perfect Cornbread

